
Using Google Cloud Armor with a Secondary IngressController on OpenShift Dedicated (GCP)
This content is authored by Red Hat experts, but has not yet been tested on every supported configuration. This guide has been validated on OpenShift 4.21. Operator CRD names, API versions, and console paths may differ on other versions.
Google Cloud Armor provides DDoS protection and Web Application Firewall (WAF) capabilities for applications running on Google Cloud Platform. This guide demonstrates how to configure a secondary IngressController on OpenShift Dedicated (OSD) running on GCP and protect it with Cloud Armor security policies.
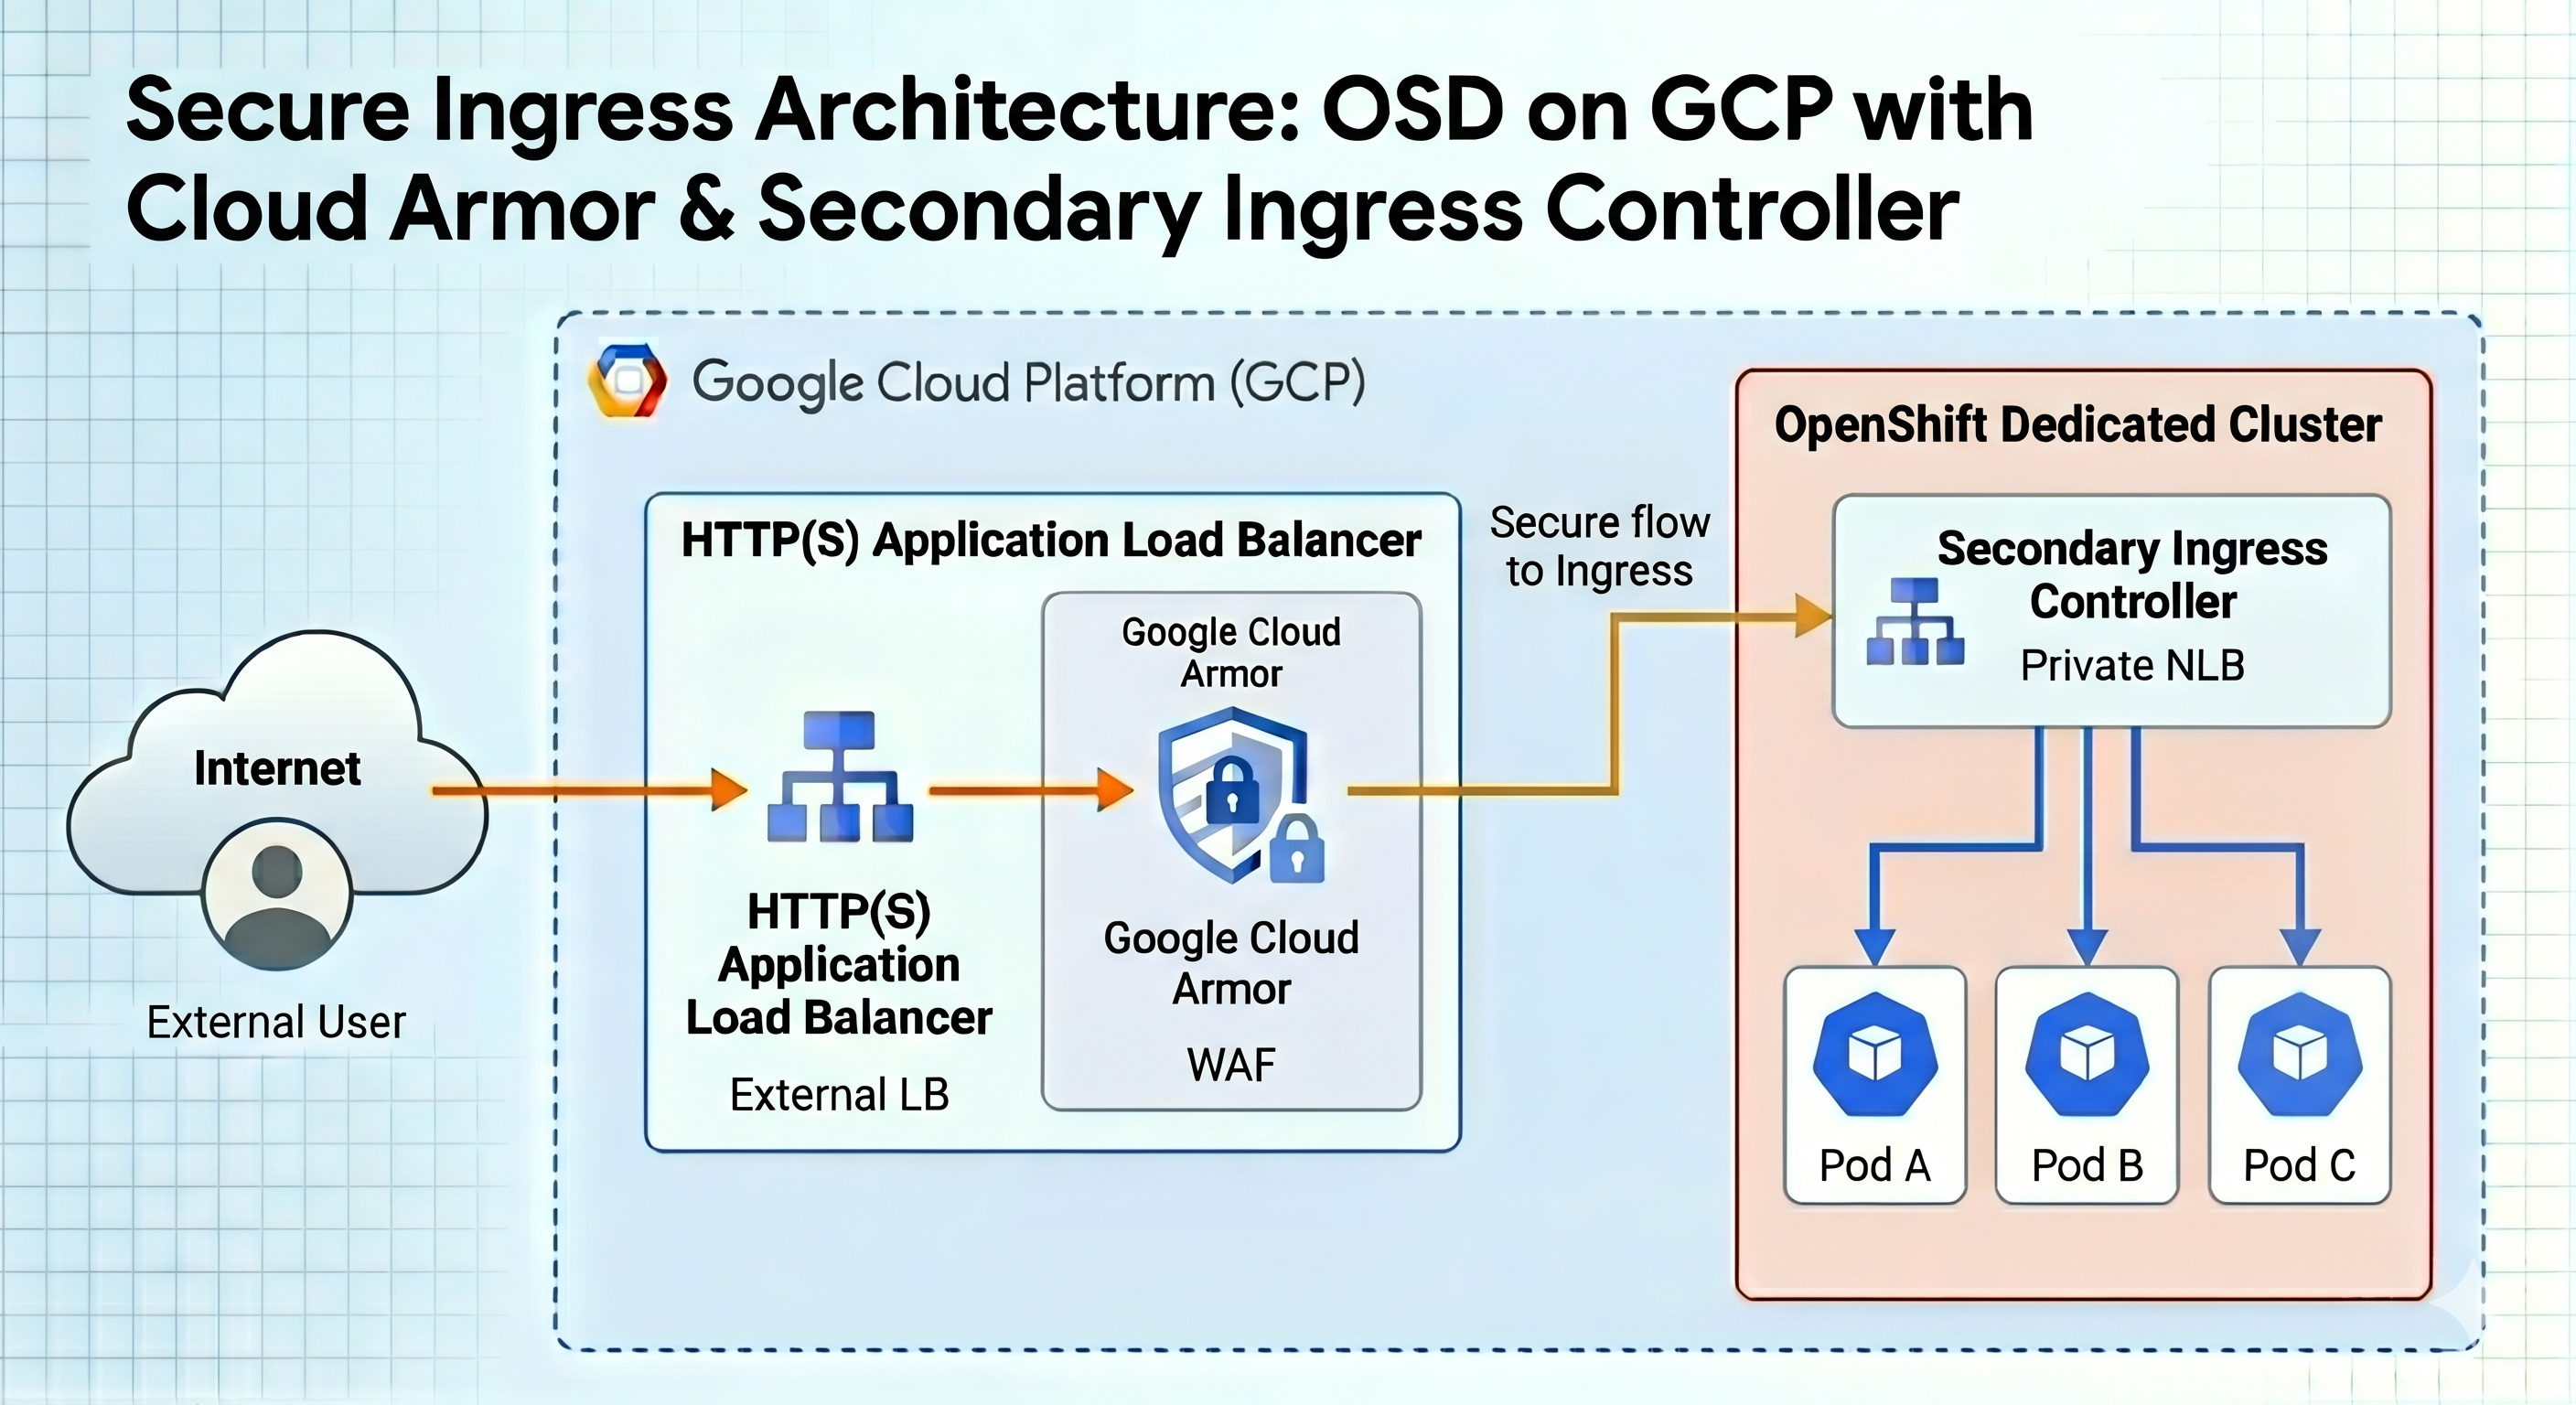
The architecture uses an HTTP(S) Load Balancer with Cloud Armor in front of a secondary IngressController, providing a secure path from the Internet to your applications: Internet -> HTTPS Load Balancer (with Cloud Armor) -> Secondary IngressController (Network Load Balancer) -> Application.
0. Why this Approach
Google Cloud Armor only works with HTTP(S) Load Balancers that have backend services. OpenShift IngressControllers create Network Load Balancers (Layer 4) which don’t support Cloud Armor directly. Therefore, we create:
- A private secondary IngressController that creates an Internal Network Load Balancer (no internet access)
- A public HTTP(S) Load Balancer with Cloud Armor security policies (internet-facing)
- The public HTTP(S) Load Balancer forwards traffic through the VPC to the private Network Load Balancer
- Applications use standard OpenShift Route objects
The traffic flow is:
This approach allows you to:
- Use Google Cloud Armor for DDoS protection and WAF capabilities
- Implement geo-based access controls and rate limiting
- Block malicious IP addresses and traffic patterns
- Keep the IngressController private with no direct internet exposure
- Use standard OpenShift Route objects instead of managing Ingress resources
- Maintain compatibility with existing OpenShift deployment patterns
1. Prerequisites
- An OpenShift Dedicated cluster on GCP v4.18 and above
- The
ocCLI logged in to your cluster - The
gcloudCLI configured with access to the GCP project - A domain name for testing (these instructions assume you control DNS for the domain)
- certbot installed. On macOS: brew install certbot or On RHEL/Fedora: sudo dnf install certbot
2. Set Environment Variables
Set the following environment variables for use throughout this guide:
The IngressController will use the domain ${INGRESS_NAME}.${DOMAIN} (e.g., cloudarmor.kevin.mobb.cloud), and applications will be accessible at *.${INGRESS_NAME}.${DOMAIN} (e.g., hello.cloudarmor.kevin.mobb.cloud).
3. Create a Private Secondary IngressController
Create a private secondary IngressController that will handle traffic from Cloud Armor:
Note: The scope: Internal setting creates a private Network Load Balancer that is only accessible within the VPC, not from the internet.
Wait for the IngressController to provision:
Press Ctrl+C when the status shows as available.
Wait for the Internal Load Balancer to provision and get an IP address:
Verify the Internal Load Balancer was created with a private IP:
The Internal Network Load Balancer is not accessible from the internet. Traffic will only reach it through the Cloud Armor HTTPS Load Balancer.
4. Create Backend Service with Internal IP
Create Network Endpoint Groups (NEGs) that point to the Internal NLB IP address. This step automatically detects all zones where router pods are running and creates NEGs in each zone for high availability:
Note: Get the ODS cluster’s VPC Network name. If VPC network has cluster name you could use following, if not define NETWORK value manually.
Note: The NEGs use NON_GCP_PRIVATE_IP_PORT type because the Internal NLB IP is managed by Kubernetes, not directly by GCP. Even though all NEGs point to the same Internal NLB IP, creating them in multiple zones provides redundancy and allows the Cloud Armor backend service to distribute health checks and traffic properly.
5. Create Health Check
Create an HTTPS health check that probes the IngressController through the Internal NLB:
Note: The health check uses port 443 (HTTPS) with a Host header (hello.${INGRESS_NAME}.${DOMAIN}) because the IngressController requires a valid hostname that matches a route. Without a matching Host header, the router returns an error page and the health check fails. The backend will show as UNHEALTHY until you deploy the test application in Section 14, which creates a route matching this hostname.
6. Create Backend Service
Create a backend service that will be protected by Cloud Armor:
Note: We use RATE balancing mode for NEG backends instead of UTILIZATION.
7. Create Cloud Armor Security Policy
Create a Cloud Armor security policy with example rules:
8. Attach Cloud Armor to Backend Service
Attach the security policy to the backend service:
9. Create URL Map
Create a URL map that routes all traffic to the backend service:
10. Create SSL Certificates
Both the Cloud Armor HTTPS Load Balancer and the OpenShift IngressController need to handle TLS for the same wildcard domain (*.${INGRESS_NAME}.${DOMAIN}). We’ll create a single Let’s Encrypt certificate and use it in both places.
Note: Google-managed certificates do not support wildcard domains, so we use Let’s Encrypt instead.
10.1. Create Let’s Encrypt Certificate
Create a Let’s Encrypt wildcard certificate (requires DNS TXT record verification):
When prompted, create a DNS TXT record for _acme-challenge.${INGRESS_NAME}.${DOMAIN} with the value provided by certbot.
Verify the DNS record has propagated:
Once verified, press Enter in the certbot prompt to complete the certificate generation.
Copy the certificates to the working directory:
10.2. Upload Certificate to GCP
Upload the Let’s Encrypt certificate to GCP for the Cloud Armor HTTPS Load Balancer:
10.3. Configure Certificate for IngressController
Create a TLS secret and configure it on the IngressController:
Press Ctrl+C once the router pods are running.
11. Create Target HTTPS Proxy
Create a target HTTPS proxy:
12. Reserve Static IP and Create Forwarding Rule
Reserve a static IP address:
Get the IP address:
Create the forwarding rule:
13. Configure DNS
Create a wildcard DNS record pointing to the static IP address.
Note: The example below uses Google Cloud DNS. If you are using a different DNS provider (Route 53, Cloudflare, etc.), follow similar steps in your DNS provider’s console or CLI to create the wildcard A record.
Using Google Cloud DNS
Using Other DNS Providers
If using a different DNS provider, create a wildcard A record with the following values:
- Name:
*.${INGRESS_NAME}.${DOMAIN}(e.g.,*.cloudarmor.kevin.mobb.cloud) - Type: A
- Value:
${STATIC_IP}(the Cloud Armor Load Balancer IP) - TTL: 300 (or your preferred value)
Verify DNS propagation:
14. Test the Configuration
Create a test application:
Test access to the application:
You should see: Hello OpenShift!
15. Verify Cloud Armor is Working
Test Geographic Restriction
If you configured the geo-restriction rule (allowing only US/CA), test from a different location or use a VPN:
Test IP Blocking
Test the IP blocking rule:
Note: Cloud Armor evaluates rules in ascending priority order and stops at the first match. The IP block rule must have a lower priority number (500) than the geo-allow rule (1000), otherwise traffic from allowed countries will match the geo-allow rule first and never reach the IP block rule.
View Cloud Armor Logs
Note: Logging was enabled on the backend service in Section 6 with --enable-logging --logging-sample-rate=1.0. This allows Cloud Armor to send request logs to Cloud Logging.
View the blocked requests from the IP blocking test above:
View all recent security policy logs:
To view only blocked requests:
16. Advanced Cloud Armor Rules
Note: The advanced rules below use low priority numbers (100, 200, 300) to ensure they are evaluated before the geo-allow rule at priority 1000. Cloud Armor evaluates rules in ascending priority order and stops at the first match, so security rules must have lower priority numbers than allow rules to be effective.
Rate Limiting
Limit requests to 100 per minute from a single IP:
Test the rate limiting by sending rapid requests:
Remove the rate limit rule:
SQL Injection Protection
Note: Make sure to delete the rate limiting rule from the previous test before proceeding, otherwise you may get rate-limited (429 errors) during testing.
Block common SQL injection patterns:
Test SQL injection protection:
Remove the SQL injection rule:
XSS Protection
Note: Make sure to delete the SQL injection rule from the previous test before proceeding.
Block cross-site scripting attempts:
Test XSS protection:
Remove the XSS protection rule:
17. Cleanup
To remove all resources created in this guide:
